
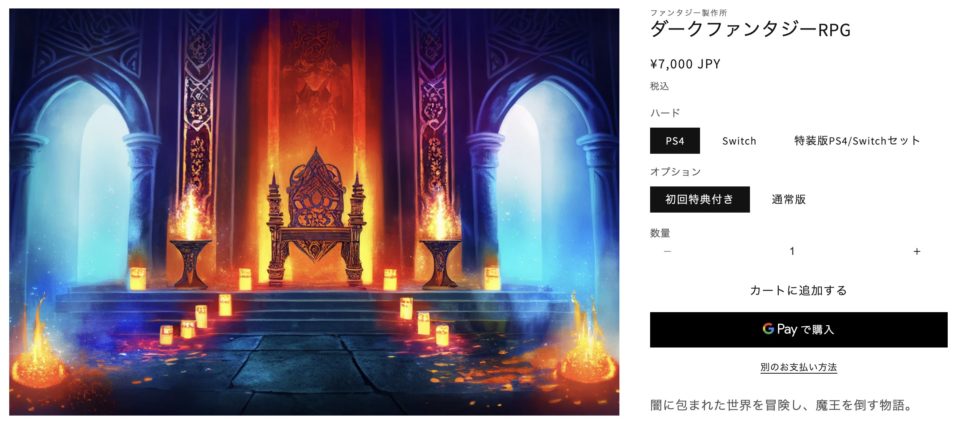
ShopifyのDawnテーマでは、コレクション(商品一覧)の商品カードに「クイック追加ボタン(quick-add)」という要素を表示することができます。
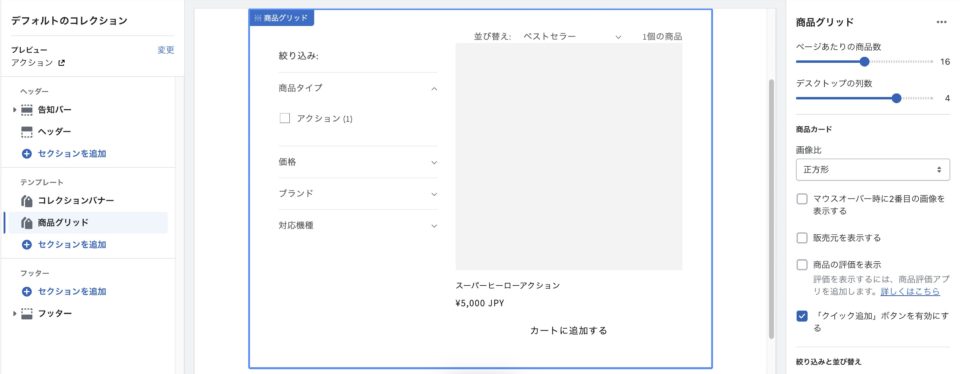
これをオンにするとバリエーションを持たない商品の場合は「カートに追加」ボタンが表示され、クリックするとその商品をカートに追加できるのですが、バリエーションがある商品の場合は「オプションを選択」というボタンが表示され、クリックすると商品情報をインクルードしたモーダルが開き、そこで通常の商品ページと同様にバリエーションピッカーでオプションを選択してからカートに追加することになります。
欲を言えば、バリエーションがある商品もその場で特定のSKUを選択してカートに入れたいですね。
こういった機能を実現できるアプリもありますが、そんなに難しいことではないので、自力でテーマカスタマイズして機能を実装しちゃいます!
今回参考にさせてもらったのはこちらのサイトのコードです。
カートに追加するフォームの仕組み
サンプルコードが何をやっているか
<form action="/cart/add" method="post" >
<select name="id">
{% for variant in product.variants %}
{% if variant.available %}
<option value="{{ variant.id }}">{{ variant.title }}</option>
{% else %}
<option disabled="disabled">{{ variant.title }} - Sold Out</option>
{% endif %}
{% endfor %}
</select><br>
<input type="submit" value="Buy now" class="variant-button" /><br> <br>
</form></div>
{% endif %}
{% endif %}

{% if product.has_only_default_variant %}
<form method="post" action="/cart/add">
<input type="hidden" name="id" value="{{ product.variants.first.id }}" />
<input type="submit" value="Buy now" class="variant-button" />
</form>
もとのサンプルのコードはとてもシンプルです。
コレクションのカードUIの中で、当該商品のバリエーションのデータをループし、select要素で選べるようにしています。
カートに商品を追加するform要素のactionが「/cart/add」になっていますが、このフォームにname属性がidのフォームパーツでバリエーションのIDを渡すと、そのバリエーションをカートに追加することができます。
バリエーションがある場合はselect要素を表示し、ない場合には単純にvariants.first.idを渡して商品を指定しています。
要するに、この仕組みさえわかっていれば、どこからでも商品をカートに追加することは可能です。
Dawnテーマに組み込む方法
上記のサンプルコードを自分のテーマで使えるようにカスタマイズする必要がありますが、せっかくデフォルトのquick-add機能があるので、そこにバリエーションの情報や数量の情報を追加で渡します。
そうすることで、カートに追加したときのアクションでポップアップやドロワーもそのまま使えるので楽ちんです。
バリエーションがある場合にのモーダルも必要ないので、バリエーションがない商品の方で使われているフォームのコードでまとめてしまいます。
card-product.liquidの.quick-addを整理
クイック追加ボタンがオンになっている状態のshow_quick_addの判定をしている箇所を修正します。
Liquidのformタグを使うことでform要素を生成することができるのですが、Dawnではproduct-formカスタム要素の中でformが作られています。
その中に、バリエーションの選択をするためのselect要素を入れるだけです。
        {%- if show_quick_add -%}
          <div class="quick-add no-js-hidden">
            {%- liquid
              assign product_form_id = 'quick-add-' | append: section_id | append: card_product.id
              assign qty_rules = false
              if card_product.selected_or_first_available_variant.quantity_rule.min > 1 or card_product.selected_or_first_available_variant.quantity_rule.max != null or card_product.selected_or_first_available_variant.quantity_rule.increment > 1
                assign qty_rules = true
              endif
            -%}

            <product-form>
              {%- form 'product',
                card_product,
                id: product_form_id,
                class: 'form',
                novalidate: 'novalidate',
                data-type: 'add-to-cart-form'
              -%}

              {% comment %} バリエーション選択のselectを表示 {% endcomment %}
              {%- if card_product.variants.size > 0 -%}
                <select name="id">
                  {% for variant in card_product.variants %}
                    {%- liquid
                      if card_product.has_only_default_variant == true
                        assign title = card_product.title
                      else
                        assign title = variant.title
                      endif
                    -%}
                    {% if variant.available %}
                      <option value="{{ variant.id }}">{{ title }} - {{ variant.price | money }}</option>
                    {% else %}
                      <option disabled="disabled">{{ title }} - Sold Out</option>
                    {% endif %}
                  {% endfor %}
                </select>
              {%- endif -%}

              {% comment %} フォーム送信ボタン {% endcomment %}
              <button
                id="{{ product_form_id }}-submit"
                type="submit"
                name="add"
                class="quick-add__submit button button--full-width button--secondary{% if horizontal_quick_add %} card--horizontal__quick-add{% endif %}"
                aria-haspopup="dialog"
                aria-labelledby="{{ product_form_id }}-submit title-{{ section_id }}-{{ card_product.id }}"
                aria-live="polite"
                data-sold-out-message="true"
                {% if card_product.selected_or_first_available_variant.available == false %}
                  disabled
                {% endif %}
              >
                <span>
                  {%- if card_product.selected_or_first_available_variant.available -%}
                    {{ 'products.product.add_to_cart' | t }}
                  {%- else -%}
                    {{ 'products.product.sold_out' | t }}
                  {%- endif -%}
                </span>
                <span class="sold-out-message hidden">
                  {{ 'products.product.sold_out' | t }}
                </span>
                {%- if horizontal_quick_add -%}
                  <span class="icon-wrap">{% render 'icon-plus' %}</span>
                {%- endif -%}
                <div class="loading-overlay__spinner hidden">
                  <svg
                    aria-hidden="true"
                    focusable="false"
                    class="spinner"
                    viewBox="0 0 66 66"
                    xmlns="http://www.w3.org/2000/svg"
                  >
                    <circle class="path" fill="none" stroke-width="6" cx="33" cy="33" r="30"></circle>
                  </svg>
                </div>
              </button>
            {%- endform -%}
          </product-form>

          </div>
        {%- endif -%}
少し詳しく説明します。
バリエーションあり・なし・ひとつのみの場合で表示を変更したい
今回、冒頭で紹介したサンプルコードからけっこうカスタマイズしました。
理由は下記のとおり。
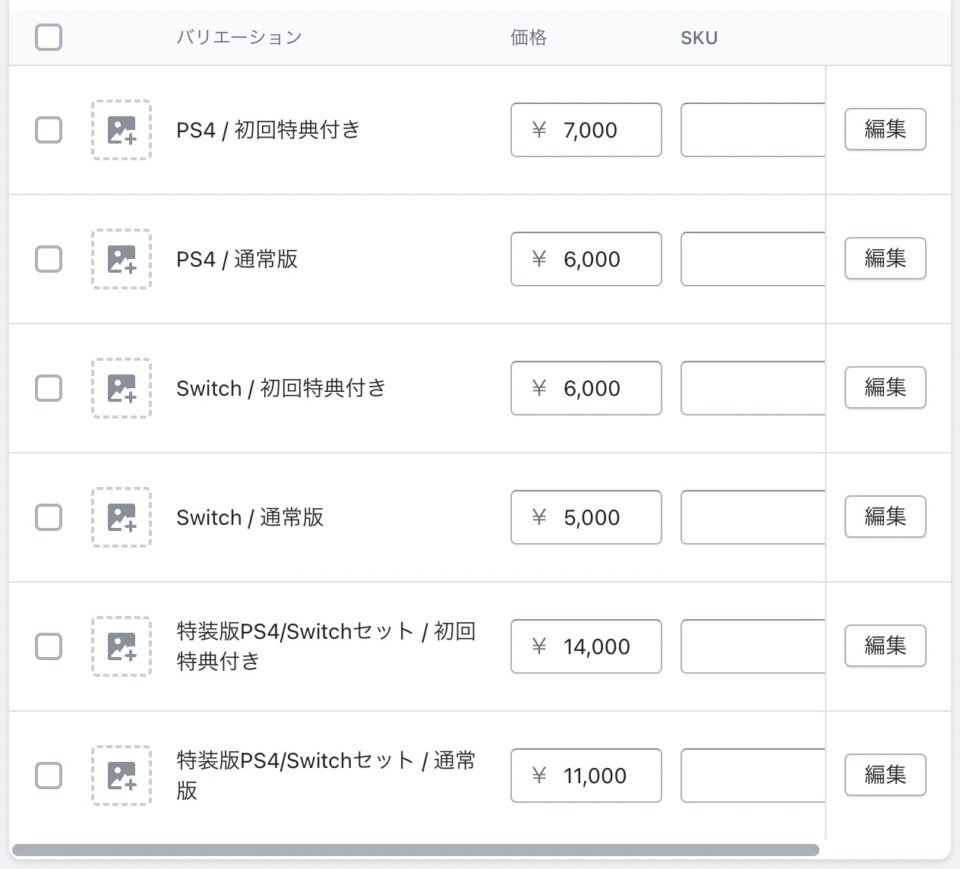
- バリエーション別の価格を表示したい
- バリエーションがひとつだけある商品にも対応したい
- バリエーションがない商品もUIを揃えたい
バリエーション別の価格を表示したい
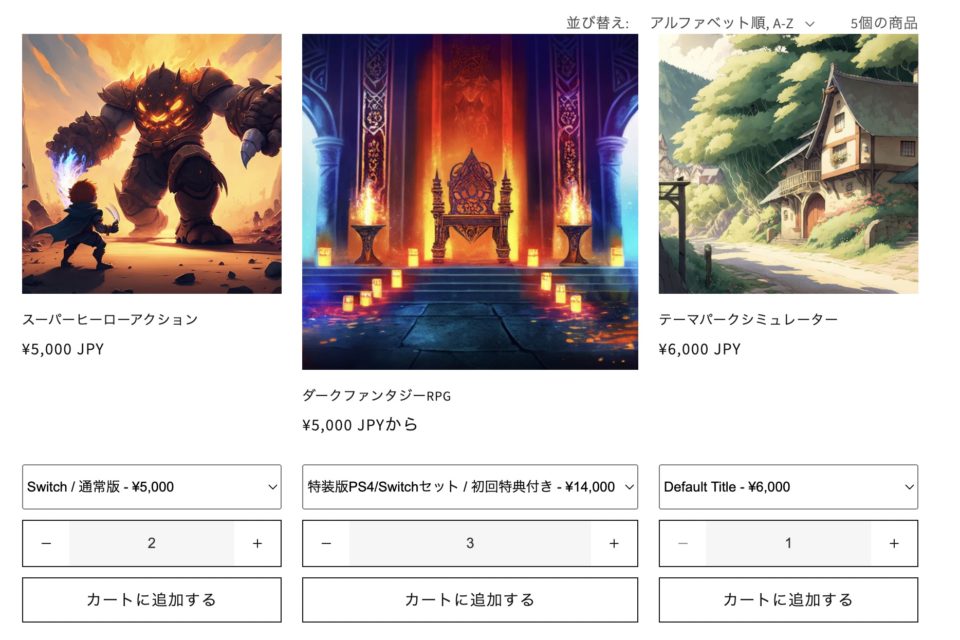
これはシンプルな理由ですが、select要素でバリエーションを選択するとき、オプション名に価格が入っていた方が親切だな、ということです。
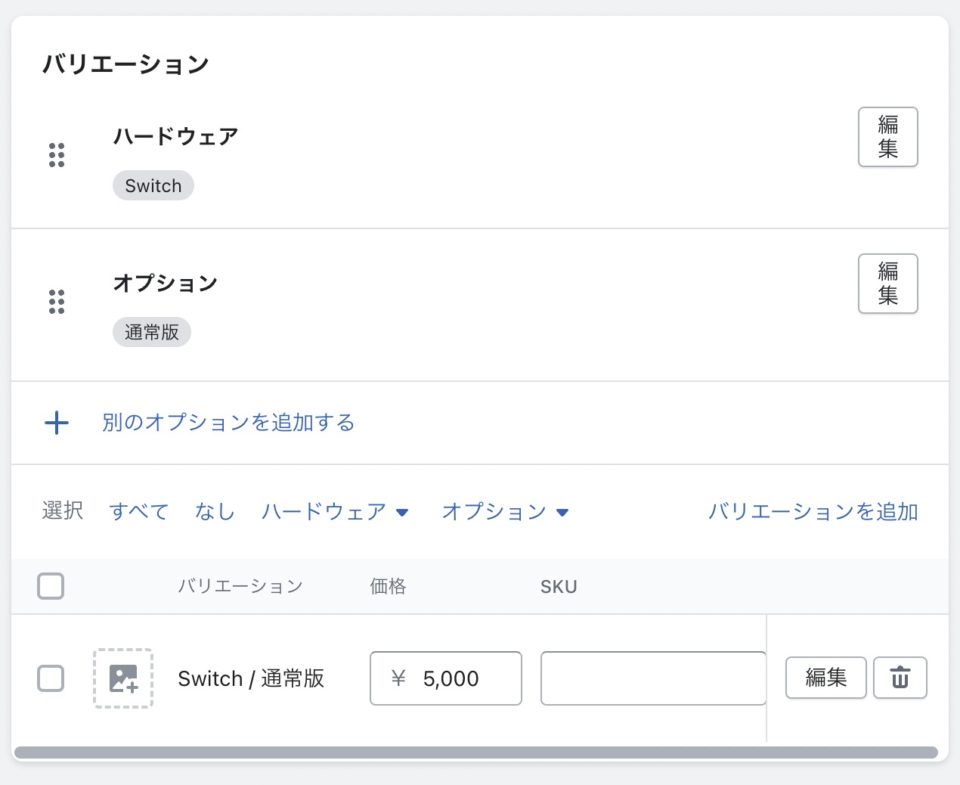
バリエーションがひとつだけある商品にも対応したい
サイトによっては、商品情報の設計上、商品単体で見ればバリエーションがひとつだけど、実際には他の商品と同じバリエーションのうちひとつだけの組み合わせがある、という場合があります。
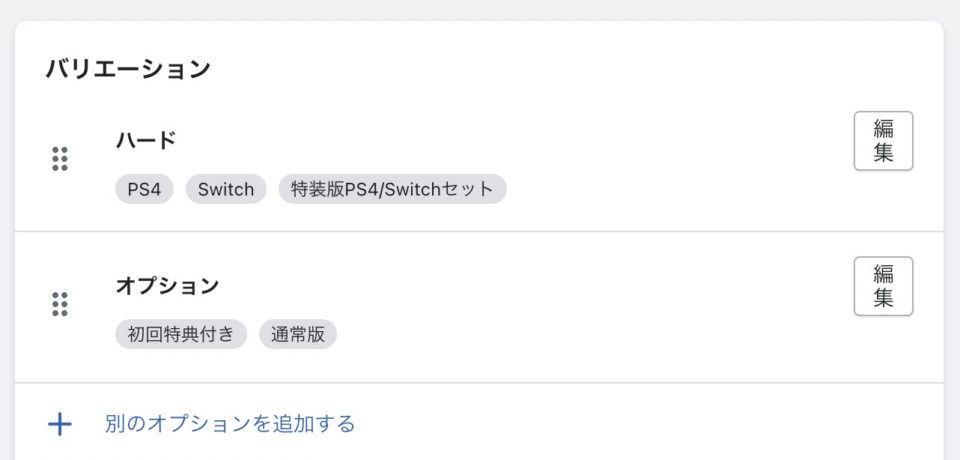
たとえば、各ゲームソフト商品に、対応するハードウェアと特典などのオプションが用意されているとします。
複数の組み合わせがある商品は以下のように複数のSKUを持っており、
- PS4 / 初回特典付き
- PS4 / 通常版
- Switch / 初回特典付き
- Switch / 通常版
バリエーションがない場合でも、同じ体裁で以下のようなSKUをひとつだけ持っている商品がある、というケースです。
- Switch / 通常版
バリエーションがない商品もUIを揃えたい
ストア内で、ゲームソフト以外のジャンルの商品も取り扱っている場合は、前述のようなSKUを持たない、本当にバリエーションのない商品も存在するかもしれません。
実際には商品によって、バリエーションあり・なし・ひとつのみ、という3種類の状況があり得るわけです。
そういった場合にも、混乱がないようにUIを揃えたい意図です。
コードの解説
まず、冒頭のサンプルではバリエーションの有無をvariants.sizeで判定しています。
variants.sizeが1よりも多いとき、という条件なので、バリエーションを持たない商品は除外されます。
しかし、「バリエーションがひとつだけある商品」の場合も、除外されてしまいます。
そこで、selectを表示するかどうかの判定は、0より大きいという条件に変更しないといけません。
もっとも、今回の対応では「バリエーションがない商品」も含めて、すべての商品で同じUIを表示するので、そもそも、この判定が不要です。
サンプルがどういった挙動になるか確認したら、削除してしまっても良いでしょう。
              {% comment %} バリエーション選択のselectを表示 {% endcomment %}
              {%- if card_product.variants.size > 0 -%}
                <select name="id">
                  {% for variant in card_product.variants %}
                    {%- liquid
                      if card_product.has_only_default_variant == true
                        assign title = card_product.title
                      else
                        assign title = variant.title
                      endif
                    -%}
                    {% if variant.available %}
                      <option value="{{ variant.id }}">{{ title }} - {{ variant.price | money }}</option>
                    {% else %}
                      <option disabled="disabled">{{ title }} - Sold Out</option>
                    {% endif %}
                  {% endfor %}
                </select>
              {%- endif -%}
そして、「バリエーションがない商品」の場合、上記の共通のコードだとひとつ問題があります。
それは、バリエーション名が「Default Title」になってしまうことです。
これはバリエーションがない商品の場合のデフォルトのオプション名に設定される名前で、通常、テーマファイルや管理画面からは編集することができません。
CSVファイルや、「MetafieldsGuru」のようなバリエーションメタフィールドを一括修正できるアプリなどを使うと見ることができるのですが、とはいえDB上のデフォルトの値なので、あまり変更しない方が良いでしょう。
ということで、フロント側で、商品タイトルを入れるかバリエーション名を入れるかの分岐をしています。
ともあれ、これでバリエーションがある商品の場合に、バリエーションを選択してカートに追加することができるようになりました。
サンプルコードに数量入力のパーツを追加
さて、せっかくなのでもう少し便利にしたいですね。
どうせカートに入れるなら、数量も先に決めておきたいです。
商品ページにはもともと数量を入力するフォームがありますから、これと同じものを作りたいですね。
main-product.liquidの下記の部分が数量を選択するフォームパーツになっています。こいつの仕組みをパクりましょう。
                <quantity-input class="quantity">
                  <button class="quantity__button no-js-hidden" name="minus" type="button">
                    <span class="visually-hidden">
                      {{- 'products.product.quantity.decrease' | t: product: product.title | escape -}}
                    </span>
                    {% render 'icon-minus' %}
                  </button>
                  <input
                    class="quantity__input"
                    type="number"
                    name="quantity"
                    id="Quantity-{{ section.id }}"
                    data-cart-quantity="{{ cart_qty }}"
                    data-min="{{ product.selected_or_first_available_variant.quantity_rule.min }}"
                    min="{{ product.selected_or_first_available_variant.quantity_rule.min }}"
                    {% if product.selected_or_first_available_variant.quantity_rule.max != null %}
                      data-max="{{ product.selected_or_first_available_variant.quantity_rule.max }}"
                      max="{{ product.selected_or_first_available_variant.quantity_rule.max }}"
                    {% endif %}
                    step="{{ product.selected_or_first_available_variant.quantity_rule.increment }}"
                    value="{{ product.selected_or_first_available_variant.quantity_rule.min }}"
                    form="{{ product_form_id }}"
                  />
                  <button class="quantity__button no-js-hidden" name="plus" type="button">
                    <span class="visually-hidden">
                      {{- 'products.product.quantity.increase' | t: product: product.title | escape -}}
                    </span>
                    {% render 'icon-plus' %}
                  </button>
                </quantity-input>
ここで注意なのですが、サンプルコードでは当該商品のオブジェクトをproductで指定していますが、この記事で使用しているDawnテーマ(v8.0.0)のコレクションでループしているアイテムはcard_productですので、すべて変更しておきます。
別のテーマを使用していたり、ほかの名前に変えている場合にはご自身のテーマに合わせて変更してください。
そのほかにも、数量を入力するinput[type=”number”]のidが、section.idになっていますね。
id="Quantity-{{ section.id }}"
しかし、コレクションページでこんなことをしたら同一のidが量産されてしまいます。
とりあえず商品のIDにでもしておきましょう。
id="Quantity-{{ card_product.id }}"
数量入力パーツのコード
修正し終わったのがこちら。
              {% comment %} 数量入力 {% endcomment %}
              <quantity-input class="quantity">
                <button class="quantity__button no-js-hidden" name="minus" type="button">
                  <span class="visually-hidden">
                    {{- 'products.product.quantity.decrease' | t: product: product.title | escape -}}
                  </span>
                  {% render 'icon-minus' %}
                </button>
                <input
                  class="quantity__input"
                  type="number"
                  name="quantity"
                  id="Quantity-{{ card_product.id }}"
                  data-cart-quantity="{{ cart_qty }}"
                  data-min="{{ card_product.selected_or_first_available_variant.quantity_rule.min }}"
                  min="{{ card_product.selected_or_first_available_variant.quantity_rule.min }}"
                  {% if card_product.selected_or_first_available_variant.quantity_rule.max != null %}
                    data-max="{{ card_product.selected_or_first_available_variant.quantity_rule.max }}"
                    max="{{ card_product.selected_or_first_available_variant.quantity_rule.max }}"
                  {% endif %}
                  step="{{ card_product.selected_or_first_available_variant.quantity_rule.increment }}"
                  value="{{ card_product.selected_or_first_available_variant.quantity_rule.min }}"
                  form="{{ product_form_id }}"
                />
                <button class="quantity__button no-js-hidden" name="plus" type="button">
                  <span class="visually-hidden">
                    {{- 'products.product.quantity.increase' | t: product: product.title | escape -}}
                  </span>
                  {% render 'icon-plus' %}
                </button>
              </quantity-input>
これを、form要素の中に入れます。
どこに入れるかは自由なのですが、まあだいたいバリエーションを選択して、それがいくつなのかを入力して、それから送信、となると思いますので、select要素とsubmitボタンの間にしておきます。
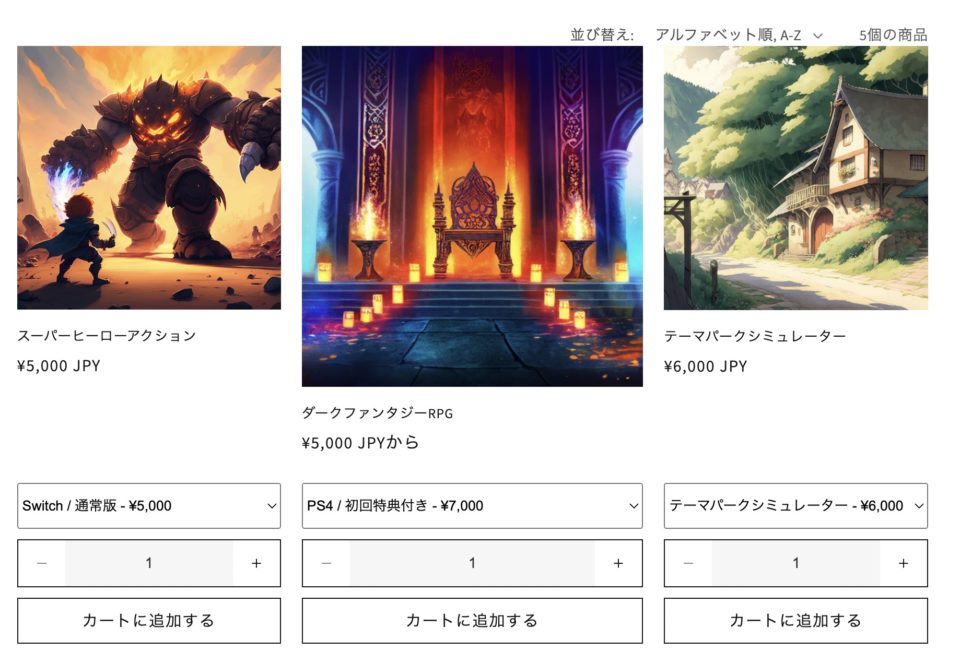
最終的なコード
これでやりたかったことが実現できます!
            <product-form>
              {%- form 'product',
                card_product,
                id: product_form_id,
                class: 'form',
                novalidate: 'novalidate',
                data-type: 'add-to-cart-form'
              -%}

              {% comment %} バリエーション選択のselectを表示 {% endcomment %}
              {%- if card_product.variants.size > 0 -%}
                <select name="id">
                  {% for variant in card_product.variants %}
                    {%- liquid
                      if card_product.has_only_default_variant == true
                        assign title = card_product.title
                      else
                        assign title = variant.title
                      endif
                    -%}
                    {% if variant.available %}
                      <option value="{{ variant.id }}">{{ title }} - {{ variant.price | money }}</option>
                    {% else %}
                      <option disabled="disabled">{{ title }} - Sold Out</option>
                    {% endif %}
                  {% endfor %}
                </select>
              {%- endif -%}

              {% comment %} 数量入力 {% endcomment %}
              <quantity-input class="quantity">
                <button class="quantity__button no-js-hidden" name="minus" type="button">
                  <span class="visually-hidden">
                    {{- 'products.product.quantity.decrease' | t: product: product.title | escape -}}
                  </span>
                  {% render 'icon-minus' %}
                </button>
                <input
                  class="quantity__input"
                  type="number"
                  name="quantity"
                  id="Quantity-{{ card_product.id }}"
                  data-cart-quantity="{{ cart_qty }}"
                  data-min="{{ card_product.selected_or_first_available_variant.quantity_rule.min }}"
                  min="{{ card_product.selected_or_first_available_variant.quantity_rule.min }}"
                  {% if card_product.selected_or_first_available_variant.quantity_rule.max != null %}
                    data-max="{{ card_product.selected_or_first_available_variant.quantity_rule.max }}"
                    max="{{ card_product.selected_or_first_available_variant.quantity_rule.max }}"
                  {% endif %}
                  step="{{ card_product.selected_or_first_available_variant.quantity_rule.increment }}"
                  value="{{ card_product.selected_or_first_available_variant.quantity_rule.min }}"
                  form="{{ product_form_id }}"
                />
                <button class="quantity__button no-js-hidden" name="plus" type="button">
                  <span class="visually-hidden">
                    {{- 'products.product.quantity.increase' | t: product: product.title | escape -}}
                  </span>
                  {% render 'icon-plus' %}
                </button>
              </quantity-input>

              {% comment %} フォーム送信ボタン {% endcomment %}
              <button
                id="{{ product_form_id }}-submit"
                type="submit"
                name="add"
                class="quick-add__submit button button--full-width button--secondary{% if horizontal_quick_add %} card--horizontal__quick-add{% endif %}"
                aria-haspopup="dialog"
                aria-labelledby="{{ product_form_id }}-submit title-{{ section_id }}-{{ card_product.id }}"
                aria-live="polite"
                data-sold-out-message="true"
                {% if card_product.selected_or_first_available_variant.available == false %}
                  disabled
                {% endif %}
              >
                <span>
                  {%- if card_product.selected_or_first_available_variant.available -%}
                    {{ 'products.product.add_to_cart' | t }}
                  {%- else -%}
                    {{ 'products.product.sold_out' | t }}
                  {%- endif -%}
                </span>
                <span class="sold-out-message hidden">
                  {{ 'products.product.sold_out' | t }}
                </span>
                {%- if horizontal_quick_add -%}
                  <span class="icon-wrap">{% render 'icon-plus' %}</span>
                {%- endif -%}
                <div class="loading-overlay__spinner hidden">
                  <svg
                    aria-hidden="true"
                    focusable="false"
                    class="spinner"
                    viewBox="0 0 66 66"
                    xmlns="http://www.w3.org/2000/svg"
                  >
                    <circle class="path" fill="none" stroke-width="6" cx="33" cy="33" r="30"></circle>
                  </svg>
                </div>
              </button>
            {%- endform -%}
          </product-form>
完成
あとはCSSで好きなように装飾をしましょう。
さらに、バリエーションごとに数量単位を切り替えるカスタマイズも可能です。参考にしてみてください。
そのほかのカスタマイズ記事はこちら